Showing posts with label wool. Show all posts
Wednesday, January 22, 2020
Burda Style Magazine 8/2014 Style #128 Coat try on
Here are the pictures I took last spring (that's why the sandals in case you were wondering) after I finished my coat.
Aquí están las fotos tomadas la primavera pasada (por eso llevo sandalias) después de haber terminado mi abrigo.
I'm very happy with the finished product.
Estoy muy contenta con el producto final.
Labels:
Burda Style mag,
Burda Style patterns,
coat,
coat making,
wool
Tuesday, January 14, 2020
Burda Style Magazine 8/2014 #128 Coat
Last spring I finished my second tailored coat (here are the posts that followed my journey into my first coat making which was part of a sew-along many years ago). The fit on this coat was a lot more relaxed than the first coat I made so the tailoring was softer. I did it with fusible interfacing and some machine "pad stitching". As usual I depend on the book t Tailoring - The classic Guide to Sewing the Perfect Jackewhenever I tackle any type of tailoring.
La primavera pasada terminé otro abrigo. El primero que hice fue parte de un "sew along" que me ayudó muchísimo (here pueden ver el proceso en el link "here") Esta vez los detalles de sastre no fueron tan intensivos como en el abrigo anterior, usé entretelas fijadas con calor en lugar de con puntos a mano. Como siempre usé como referencia el libro Tailoring - The classic Guide to Sewing the Perfect Jacke


Burda instructions have you cut the undercollar in one piece. I had a feeling that it was better to cut in two pieces on the bias and Tany (read her wonderful blog) answered my question on Instagram and confirmed that it allows for better roll of the cloth.
Las instrucciones the Burda te guían a cortar la pieza del cuello en una pieza. En mi experiencia es mejor cortar el cuello al bies y en dos pedazos para que encaje mejor. Le pregunté a Tany (lean su blog, es maravillloso) por su opinión y me dijo que ella siempre transforma los cuellos de Burda a dos piezas.

There's a dart under the collar that adds shape and which I have seen in other designs. This is the kind of detail that I love about Burda patterns.
Hay una pinza debajo del cuello. Este detalle ayuda con el entalle y es una de las razones por las que me encantan los patrones de Burda.
The fabrics are a wool coating, silk lining and cotton flannel. I lightly quilted the flannel to the silk to add extra warmth.
Las telas son tela de abrigo de lana, seda para el forro y franela de algodón. Yo con puntadas alrededor de ciertas flores del estampado uní el forro a la franela para agregar insulación al abrigo.
You can see the quilting in the pictures of the hem below.
Pueden ver las puntadas en las fotos de abajo
The inseam pockets are topstitiched to the front.
Los bolsillos llevan pespuntes al frente del abrigo.
The back pleat had me scratching my head for a bit but it look different than I had made before.
La construcción de la abertura de atrás me confundió un poco porque es distinta a lo que he hecho anteriormente.
Here is the final look
Aquí ven como se ve
And here how it looks inside before attaching the lining
Aquí ven como se ve por adentro antes del forro
I followed the instructions from Paukshte Sewing Workshop (link is to part two on finishing the hem). I'm loving the results! Highly recommend these videos.
Seguí las instrucciones de Paukshte Sewing Workshop (Parte II que cubre como hacer los dobladillos). ¡Me encanta como quedó! Les recomiendo estos videos.
To keep the clean lines of this design I chose to keep the closures as shown in the magazine. I used large beautiful snaps.
Para mantener el estilo simple de este diseño agregué broches de presión como recomienda Burda. Estos broches bellos los encontré en New York.
Next post I will include pictures of the final product on me. Of course they are also available on Instagram.
La próxima vez les enseño fotos del abrigo puesto. También pueden verlas en Instagram.
La primavera pasada terminé otro abrigo. El primero que hice fue parte de un "sew along" que me ayudó muchísimo (here pueden ver el proceso en el link "here") Esta vez los detalles de sastre no fueron tan intensivos como en el abrigo anterior, usé entretelas fijadas con calor en lugar de con puntos a mano. Como siempre usé como referencia el libro Tailoring - The classic Guide to Sewing the Perfect Jacke


![]() |
| Shell without lining |
Burda instructions have you cut the undercollar in one piece. I had a feeling that it was better to cut in two pieces on the bias and Tany (read her wonderful blog) answered my question on Instagram and confirmed that it allows for better roll of the cloth.
Las instrucciones the Burda te guían a cortar la pieza del cuello en una pieza. En mi experiencia es mejor cortar el cuello al bies y en dos pedazos para que encaje mejor. Le pregunté a Tany (lean su blog, es maravillloso) por su opinión y me dijo que ella siempre transforma los cuellos de Burda a dos piezas.

There's a dart under the collar that adds shape and which I have seen in other designs. This is the kind of detail that I love about Burda patterns.
Hay una pinza debajo del cuello. Este detalle ayuda con el entalle y es una de las razones por las que me encantan los patrones de Burda.
The fabrics are a wool coating, silk lining and cotton flannel. I lightly quilted the flannel to the silk to add extra warmth.
Las telas son tela de abrigo de lana, seda para el forro y franela de algodón. Yo con puntadas alrededor de ciertas flores del estampado uní el forro a la franela para agregar insulación al abrigo.
You can see the quilting in the pictures of the hem below.
Pueden ver las puntadas en las fotos de abajo
Los bolsillos llevan pespuntes al frente del abrigo.
The back pleat had me scratching my head for a bit but it look different than I had made before.
La construcción de la abertura de atrás me confundió un poco porque es distinta a lo que he hecho anteriormente.
Here is the final look
Aquí ven como se ve
And here how it looks inside before attaching the lining
Aquí ven como se ve por adentro antes del forro
I followed the instructions from Paukshte Sewing Workshop (link is to part two on finishing the hem). I'm loving the results! Highly recommend these videos.
Seguí las instrucciones de Paukshte Sewing Workshop (Parte II que cubre como hacer los dobladillos). ¡Me encanta como quedó! Les recomiendo estos videos.
To keep the clean lines of this design I chose to keep the closures as shown in the magazine. I used large beautiful snaps.
Para mantener el estilo simple de este diseño agregué broches de presión como recomienda Burda. Estos broches bellos los encontré en New York.
Next post I will include pictures of the final product on me. Of course they are also available on Instagram.
La próxima vez les enseño fotos del abrigo puesto. También pueden verlas en Instagram.
Labels:
Burda patterns,
Burda Style mag,
Burda Style patterns,
coat,
coat making,
tailoring,
wool
Friday, July 27, 2018
Vogue 1567 Paco Peralta for Vogue Patterns
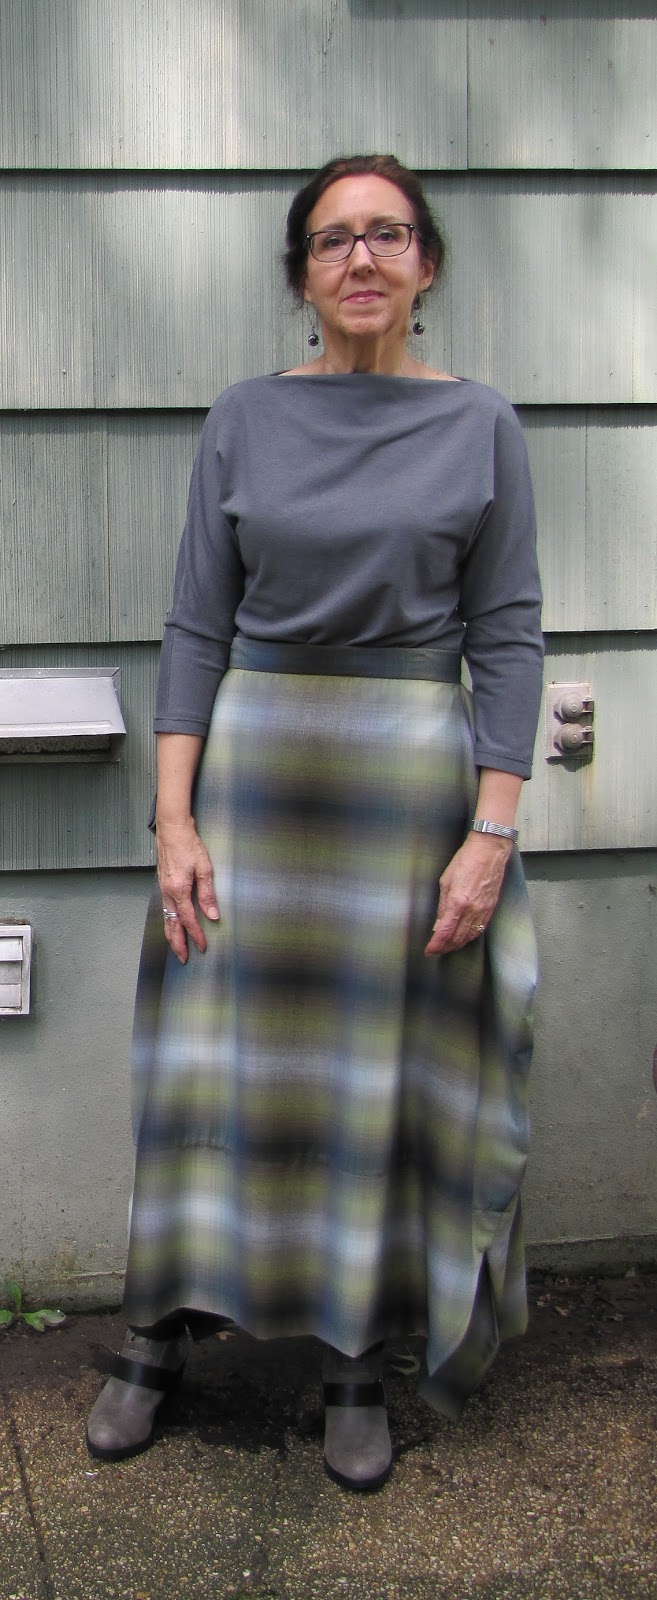
You might be asking yourself what am I doing wearing a fall/winter outfit in high humidity/temperature weather. It is a good question and here is why. I finished this outfit months ago and never had the chance to photograph it. When I saw that Vogue has fall patterns out and with the encouragement of my friend Paco I decided that now was the time to do it. Before I say anything, I love this outfit!!!!! I love the skirt and top and I love that the way I envisioned this pattern is what I got!!
Me imagino se están preguntando qué hago vestida para frío cuando hay calor y humedad. Muy buena pregunta y les digo por qué. Terminé este conjunto hace meses y no tuve oportunidad de tomar fotos. Cuando vi que Vogue había sacado los modelos del otoño me dije que aprovechara y acabara de mostrarselos pues además estoy encantada con él. ¡Me encanta este modelo! Y muy contenta de que como yo deseaba que me quedara así quedó.
The fabric for the skirt I bought at Fabric Mart (https://www.fabricmartfabrics.com/) when I visited the store with a group of sewers a few years ago. It is a wool plaid with distortion? In person it looks more of a plaid :-)
La tela de la falda la compré en Fabric Mart (https://www.fabricmartfabrics.com/) cuando visité la tienda ya hace varios años con un grupo. La tela es de lana con un diseño de cuadros distorcionado que en persona se nota el cuadro más.
The top is made out of ponte knit. I love the v-neck in the back.
El pulover está confeccionado de tela de punto (ponte knit). Me encanta el cuello de pico en la espalda.
Both fabrics came from my stash.
Las dos telas salieron de mi colección. :-)
The waistband is a little loose on me because I lost some weight after the skirt was finished. I plan to take some temporary tucks on the sides so that the waistband holds up the pleats a little better.
El fajín de la cintura me queda grande pues perdí peso después de haber terminado la falda. Planeo cogerle un pequeño pliegue en cada lado para que que los pliegues (que son bolsillos) tenga mejor soporte.
The skirt is completely finished with bias binding. The construction was challenging and required patience when it came to the 3 seams unions....but did I tell you how much I love this outfit? Totally worth the work!
La falda está completamente terminada con bandas al bies. La construcción tuvo sus momentos más trabajosos, especialmente en las uniones de tres costuras...pero les dije lo mucho que me gusta el resultado? ¡Todo valió la pena!
![]() |
| I like wearing it with a belt also. |
I loved this pattern as soon as it came out and I'm so glad that I made it up. Another winner from Paco!
Me enamoré de este diseño en cuanto lo ví y estoy muy contenta que lo hice. ¡Otro bello diseño de Paco!
No pude resister darle un filtro de otoño a esta foto.
Subscribe to:
Posts (Atom)